Tuesday, October 12, 2010

Just a little note...

So, Werner refused pictures today, his haircut was not pleasing.  I'm thinking it's all the dried glue in his hair myself, but it could be the uneven cut...
So, in lieu of Werner and his new 'do, I've made a card!  Because I have a swap I'm working on and was forced into my craft room... :)

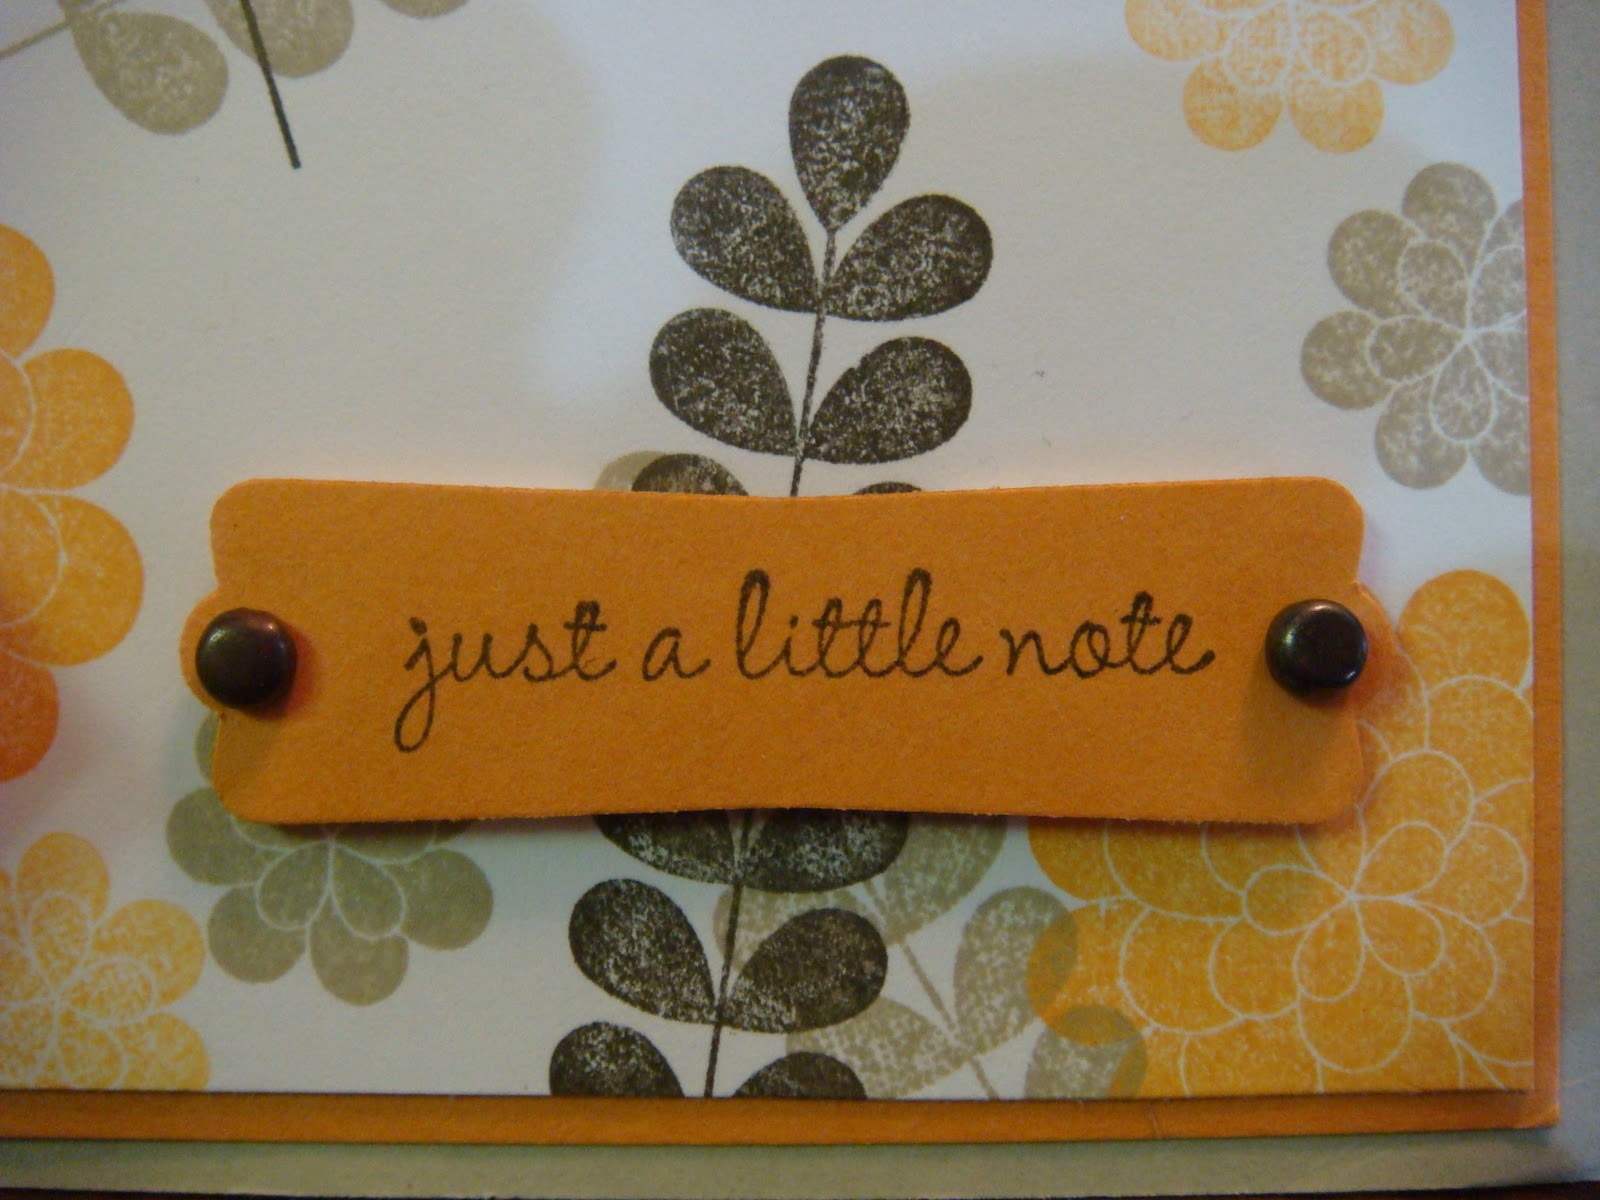
I used Stampin' Up! supplies for this - Peach Parfait, Early Espresso, and Crumb Cake are the colors; the ribbon is Pumpkin Pie; the brads are the Metallic 'Antique Brass'; the stamp set is 'Apple Blossoms', a level two hostess set.  This was an easy card to make, but is really cute in person. 

Using Whisper White paper, I stamped images from the set randomly across the paper - you know that technique you learned when you first started stamping, where you could make 10 different cards all from one stamped page?  This is that technique - stamp the images randomly and in different colors/shades across the white paper.  The new 'background' paper can then be used on a number of cards as a background for anything you want.  I'd show you here, but again, this was for a swap, so I used it to make a number of the same card! 

On the Peach Parfait area of the card, I just used the flower image from the set and stamped it randomly in the same color, Peach Parfait. 
You get the idea...and don't forget to stamp inside the card for a little something extra!


Sunday, October 10, 2010

Wookies...

Yes, wookies, and no, it's not a cute name for cookies in my family...
I should have been taking pictures all along, but you're going to have to come into this discussion part way through.  I attempted my first OOAK (One Of A Kind) doll creation a few weeks ago, and I've been letting him sit on my windowsill to dry.  I made him out of Paperclay (love it!), and him is a Hedgehog, I think I'll call him Werner...'cause he's a bit of a worrier!  Yes, well, at least I amuse myself. 

So, he sat naked in the window, no paint or hair or anything, for a few weeks.  He was sort of cute and I was waiting until he told me what he wanted (yes, I talk to to inanimate objects...we have looong conversations...).  Today I picked him up and painted him, and he was so cute, but still nekkid (!), and yes, I should have taken a picture.  It's quite amazing what you can do with Paperclay and only two colors of paint with a little water.  My next thought, and my hubby agreed, he needed some hair (not many bald hedgies out there). 

I surfed the net and looked around, but there is not much information on how to attach hair to clay dolls, other than to 'glue it on'...what kind of glue? How do you prepare the hair?  What kind of hair?  I had some wool roving in a pretty brown with all sorts of browns mixed in, so it was perfect for Werner.  I figured I'd just do it - so, I broke out Elmer's 'Glue-All' which promises to stick porous and most non-porous surfaces, combed out some wool roving to make a relatively straight line of hair, and tried it.  I dipped the clippings of roving in the glue and smooshed it around, then stuck it on poor Werner, all over.  I have to agree with my hubby, he looks like a baby Wookie. 

See??  So I suppose you can understand why he seems a bit worried...I was thinking he was nervous about where to sleep for winter, but I'm guessing it's the hair-do...no one said I was a stylist.  How do people get this stuff on perfectly?? 

Ok...Werner will be back to say hello after his appointment with the hair-dresser tomorrow.  I just hope he doesn't get a bad haircut...

Monday, August 16, 2010

Birthday Circles

We have a birthday in the family tomorrow, and I've promised to use my stamps more, so everyone gets a handmade birthday card this year...or at least, that's the goal...

I hope you like this one.  I tried to coordinate with the wrapping paper I used for the gift - strangely the paper matched my Stampin' Up! colors perfectly - it has a Certainly Celery background with Daffodil Delight and Tempting Turquoise dots.  You have to love when things come together.  I would not have picked those colors, but I think they actually turned out quite pretty together. 

I used my Top Note Big Shot die, along with a hole punch for the little circles.  I cut a Top Note out of white and Tempting Turquoise cardstock, and half of one out of Certainly Celery.  I decorated the top half of the white with some birthday stamps (...from one of the free 2010 Sale-A-Bration sets) and the turquoise paper with some circles from the Circle Circus set (115778, $28.95).  I stuck them together with some Jumbo Eyelets (108432, $9.95, 60 pieces), and tied some pretty Certainly Celery ribbon on it (also from a free set of ribbon...).  I punched a bunch of circles with my hole punch in turquoise and daffodil to line the separation of white and Certainly Celery papers.
As a finishing touch, I punched out some little labels from the Tiny Tags set (118592, $16.95, Clear stamps) which read '4 You' and 'hand crafted', and attached them to the Certainly Celery ribbon with some pretty 1/4" Grosgrain Ribbon in Daffodil Delight (120928, $4.95).   You can also see in the background that I decorated the envelope with some of the circles from Circle Circus in the three ink colors, and added a bit of sticky glitter to the candles on the cake to finish it off. 

I hope she enjoys the card!

Tuesday, August 10, 2010

Chanterelle Hunting...

When I was a little girl (seems like a looong time ago...) my family would go to Oregon to visit various relatives, and in the fall, we'd get to go Chanterelle mushroom hunting with my Grandparents. 

Now, anyone who knows me knows I always ask the waiter for my dishes sans 'shrooms, I really hate the texture (this from someone who remembers what play-doh tastes like...).  However, I fondly remember trudging through the forest, carefully looking for these perfect little mushrooms, trying to avoid any poisonous ones (what's a kid know - yes, they were always double checked by Grandma; wonder how many she threw out??).  Once the bag was full of plump and perfect 'shrooms, we would head on home and wait for the feast. 

My Grandma, like Grandma's used to do (...some may still...) would grow what she liked, can lots of stuff, hunt up mushrooms (see above), pick wild berries for jams and pies, fish for dinner (may have been Grandpa on that one...), and make food for everyone.  And we always played outside, no TV (...can't imaging that today...).  When we made it back from mushroom hunting, Grandma would clean them off and get ready to cook them, dipping them in batter and frying them up, like big steaks (...no, I don't batter my steak, but I remember everyone kept saying, just cook them like steak...why??).  And we'd eat them as soon as they were ready, and there was nothing quite like the taste of fresh picked Chanterelles.  They didn't have that odd mushroom texture, and they did remind one of steak, even though they weren't juicy.  And Fall, they always remind me of Fall with their golden coloring, and harvest, and afternoons in the forest and around the kitchen counter.

So, the other day I was wandering the produce aisle at one of our upscale grocery stores (O'Briens here in Modesto, excellent food choices, good prices...), and saw a basket of fresh Chantrells.  These were on the small side, I don't believe it's quite harvesting time yet, but they looked perfect to me.  I grabbed a little handful (...these are expensive 'shrooms...$29 a pound...oh to go find my own without poisoning myself...that would be a trick.)  This morning I saw that forgotten handful in my fridge, and feeling really hungry, not to mention ready for Fall, I grabbed them, with a small shallot and some eggs.  I wanted to make a quiche, but really, I was hungry, so settled on an omelet. 

This is not something I cook well - my omelets are a bit flat and brown on the bottom...my dad can make these perfect and fluffy - the talent was not passed down.  So after calling my dad (...the omelet guy...he knows everything...) I sauteed a bit of shallot and Chantrelle in butter, set them aside, then made my omelet.  Once it was almost done and ready to fold (...I need practice, don't blame the pictures on my dad's teaching, he'd be horrified at what they look like...love you daddy!)  I threw on some shredded cheese (...Parmesan Reggianito, from Argentina, by way of O'Briens Supermarket...they have the best cheese shop there!  and this stuff is the most delicious cheese, great with pasta, wonderful full flavor...), tossed in my shallots and Chanterelles, and folded the omelet. 

Now, you see the picture before you...it was a tad brown on the top and bottom, and a bit flat and messy looking, but mmmm...yummy.  Chantrelles had their nice fall flavor, the butter and shallot added a nice bit of toastiness to it, and the amazing Parmesan Reggianito flavor really brought it all together with a smooth, nutty creaminess (hmmm...)...  I still think a quiche would have been better, but this was good.  And it reminded me of happy childhood memories and the fact that Fall is on the way...

Saturday, August 7, 2010

Happiness Always

So, this is my attempt at the pretty little stand-up cards everyone is making. 

This is a 3x3 card you can stand up on your desk, it unfolds nicely and makes a nice little gift card.

To make, it's easy, there are instructions all over the web for this, especially at http://www.splitcoaststampers.com/.  They have instructions for everything there!

I used a 6"x3" strip of card stock for the card itself (blue) and a 3"x3" square (also blue) for the top.  Take your 6"x3" strip and make folds (with your bone folder) at 1 1/2" and 3".  Decorate your 3"x3" square.  You can probably figure it out from here - you tape the (blue) 3"x3" square to the top 1 1/2" - see this picture to get the idea (...you want it to fold in on itself, does that make sense?  It folds flat with your decorated 3"x3" square facing up).  You can decorate the inside 3"x3" as well. 

You want to make the decoration on the inside slightly raised, so that when the card slides forward, it will stop it from closing.  I'm guessing this comes at a later point - mine is barely touching the inside cardstock, I'm assuming it's because it's new?  Hmmm...  It also appears that you can write a little note to someone under that blank spot where the card rests (above photo). 

I basically used scraps on this one.  You know all that old DSP you have sitting around?  Those are the scraps I'm talking about.  In addition, I used the lace Stampin' Up! punch, along with some new Stampin' Up! Daffodil Delight 1/8" ribbon. 

Hope you like it!  Now go try it...even those of you with no fancy paper...!

Thursday, August 5, 2010

Greenhouse Gala Cards

Hi everyone!

It's been a few days and I wanted to share with you one of my favorite new Stampin' Up! sets and papers (DSP). Greenhouse Gala (117167, $9.95) DSP and Friends Never Fade (120618, $13.95, clear set).  The  stamp set and paper is so cute and very 'retro' looking to me, with the bold colors.  I think I mentioned them in my last post to you.  I liked them so much I painted my bathroom a pretty melon color that reminded me of a mix of the oranges and yellows in the set...not my normal color scheme!  I'm still not sure how to decorate the walls now that I did that...very bright, happy color...

The following samples are all made with Stampin' Up! supplies.  If you need any paper or supplies ordered, just send me a note and I can get you started.  Hope you enjoy the samples.

I'll make some more over the next few days so that you can see the range the DSP has to it.  It's so happy!


Thursday, July 29, 2010

Mojo Monday on Thursday

Ok, it took a few days to find my mojo...my stampin' mojo ;) 

I love the Mojo Monday blogspot (mojomonday.blogspot.com).  It really helps when you are in a pickle about making a new card.  Once a week a new card design is posted and people from all over the globe post their samples.  There are some very creative people out there.  You should take a look if you're ever stuck for a new design or need a creative kick in the pants. 

I decided to use Halloween as my theme.  Everyone knows that you should start holiday cards a few months in advance (...something I rarely do...I try every year though, see my comments below...).  The theory goes that in this way you can finish them all before the holiday and send them out to everyone you know.  However, if you're anything like me, you'll have enough time to play with your holiday card supplies until just before the holiday then frantically make up a bunch to send out two days before!

I used some of last year's Halloween DSP (you have to use those scraps sometime!).  If you're anything like me, you have hoards of paper you don't want to let go or use because you'll run out of it.  Logically, you understand that you bought it to use, but still, it's so pretty, you don't want to run out.  Well...I made myself a vow to use the old (very difficult...) before I buy the pretty new DSP's that Stampin' Up! has in the new catalogue.  It's hard to part with, but I did it!  As you can see in this card and a few of the other cards I posted.  Baby steps...

The set is from the current catalogue (House of Haunts, 111574, $22.95).  Nice and spooky!  I used some of the little sponge daubers to make the moon with the new Daffodil Delight ink.  I didn't have a circle template for the moon, so I used my small circle punch on a piece of scrap and made my own template.  The card itself is gray textured cardstock (...I know, you can't see the texture, which is why I'm sharing that with you...), and I used a stamp I had of bats to add an extra touch to the inside of the card and the envelope.  Don't forget to decorate your envelopes - it gives people a sneak peek of what's inside.

Hope you like it!

Wednesday, July 28, 2010

Anniversaries Continued

OK, today is the last Anniversary for a few months...below is the card I made.  You can see the detail on the Designer Series Paper (DSP) in the second picture.  It's a nice 'soft' design perfect for a wedding or anniversary card background.  I'm sure you have some sitting around in a 'bits & pieces' pile - this is the time to use it.  I just love the bird punch that Stampin' Up! has, it's so cute and good for many projects.  I used some of the Elegant Eggplant cardstock and ink to make the birds stand out a bit, along with the wording...no black here!

I'm trying to use up some of my older DSP before I buy a bunch of new packages.  The paper I used is from the previous catalogue, as is the lilac colored plain cardstock; all supplies are Stampin' Up!  It's funny, I have no actual 'Anniversary' stamps to make cards with, so I've had to be creative with some of the word stamps I have.  Just goes to show you don't have to have the perfect saying with your stamps.  Use something reminiscent of the situation then add a nice handwritten note inside. 

People don't really send many cards anymore...I think they should have a 'Handwritten Note Holiday' on the calendar somewhere, so people can get back to personalizing things.  What do you think?  Don't you love to get mail and handwritten letters?

Monday, July 26, 2010

Anniversaries

This week is Anniversary week in my family.  My parents are today, my brother and sister-in-law tomorrow, and my in-laws the next day.  My husband and I broke the tradition and waited until October!  There is still one brother-in-law left, currently unmarried, so we'll have to see where he falls when he makes the leap.  I thought I'd post a card or two in commemoration...or just in case the card doesn't make it on time to the recipient, they can look here and see what's on it's way :)  As is the case with my parents card...I thought they'd be out of town for a few days (who leaves Vegas?), so I procrastinated and finished the card last night, sent it off this morning. 
Let me know what you think of it.  I think it turned out nice and 'anniversary' like.  I'm a Stampin' Up! demonstrator, so I had a lot of toys to play with to make it.  The new Catalogue came out recently, so I was able to use some of my favorite new Designer Series Paper (DSP) 'Greenhouse Gala' and my favorite new set 'Friends Never Fade' - they remind me of Art Nouveau styles...love them!  I'll post some more cards soon using the sets...


Tuesday, July 13, 2010

Mint Chocolate Chip


I escaped to my little cottage two days ago and attempted an old recipe with a minor adjustment.  Unintentionally, I created Mint Chocolate Chip soap...oddly enough, not a drop of chocolate or cocoa in it!  I was pouring in the scent at the end of trace and my husband walked in and asked about the ice cream...I told him it was soap and he walked away mumbling about ice cream. 

I took pictures again, lucky you.  Some day, after I make my first million selling soap, I'll hire a good photographer to make these look really, really good.  You'll have to put up with me until that point.   

Back to the soap...  I found a note in an old soapmaking book that talked about super-fatting the soap with Shea Butter after trace, as Shea Butter doesn't completely react with the lye in the soap; it remains behind and adds nice conditioning oils in the finished soap.  I'm not sure if this is correct or not, but I'm trying it out.  In addition to this, I picked up a pretty little packet of green oxide to add a bit of color.  So this would be three firsts for me (does that add up?) - first with super-fatting after trace, first with coloring soap, and first with swirling. 
This is a basic recipe using Coconut Oil with a touch of Shea Butter, Vegi Oil (yep, Crisco), Olive Oil, and Lye.  Nothing fancy here.  This is a recipe I received when I took a soap making class over 10 years ago, and everything was by volume, not weight, so I broke out my old measuring cups to make this.  This isn't the most scientific method, no exact figures here (really, who among us really takes the time to measure out a perfect cup??).  For all it's non-scientificness (new word), it used to make the best bar of soap with a wonderful, creamy lather that lasted forever, and gentle enough for babies and those of us with picky skin.   After trace, I added a heaping teaspoon of melted Shea to the mix, along with the Green Oxide (I'm going to have to look that up, not sure that's the proper name...) and a sprinkling of crumbled Spearmint leaves (the bag of peppermint leaves nowhere to be found, I should have noted that as a sign...).  I used the 'Williamette Valley Peppermint' essential oil from Majestic Mountain Sage (http://www.thesage.com/) as my scent.  I think next time I'll leave out the dried leaves, they turn a soft brown after curing and it really ruined the look I was going for (moldy ice cream??).  Does anyone else have that issue when using Spearmint or Peppermint leaves to the soap mix?  See the pics below and let me know... 

So here are the soaps.  I had enough for two little crates (the photos at the beginning of this post, soooo cute!  You have to see these lovely vintage Velveeta crates...that shop in Jamestown CA again...) so I decided to make them each a bit different.  The first is the plain old soap with swirls of color mixed with my spatula (too thick to use a knife and swirl carefully), the second I swirled less color and added a bit of crumbled spearmint leaves across the top (I don't plan on doing this again, they don't stay that pretty green color...you'll see...).  I love the darker swirls in the one soap, but the brown bits kinda ruined the look, almost like sea foam.  They do seem to be curing well, as I was able to cut them today.  There were even some suds on the knife when I rinsed it off and the soaps seem to have a creamy texture.  And a nod to my husband...they still smell like Mint Chocolate Chip ice cream...I'll have to mix in some Cocoa Butter next time and see how that smells...
Let me know your thoughts, I'd love to hear from you.

Sunday, July 11, 2010

Finally Soaping Again!

The house smells quite pleasantly of lavender and honey today...
I wrote this the other day on the 4th of July.  It was about 98◦ outside and our air conditioner was not working. The overhead fans were on inside, spreading the scent throughout the house. It was a balmy 80◦ inside, perfect for soapmaking, especially with that lovely scented breeze. My soapmaking attempt of the day? Yep...a lovely Lavender soap, with oatmeal and honey.

A little background for you, as this is my first post...I had a whole bunch written to bore you with, but figured you could look over at the 'About Me' section and see it over and over (lucky you!).  So, here we'll start with the fact that I was married recently (a year in October, yay!) to the love of my life, who has been waiting patiently for me to make my soap.  Here's a bit of the story...

My wonderful man lived in a far away city (at least 2 hours from where I was living...) and told me, quite nicely, that I was free to be unemployed while settling in to my new home. YIPPEE, I thought, I can start making lots and lots of soap and herbal bits (sooo much fun!) and sell them at craft fairs and on-line and show him how nice it will be to have a wife who makes soaps, and herbal salves, and all manner of odd and wonderful crafty things (whew! long sentence...) Alas, almost a year has passed and my soapmaking has been little and far between. I have been playing with recipes here an there, but have been generally quite unproductive.

So, July 4th I decided to restore his faith in me (quite a wonderful husband, still hasn’t said a word about the non-existent soap and herb business...very patient) and I started off with a bit of hot process soapmaking in the crock-pot! I’ve been enamored lately of the look hot-process soapmaking creates (not mine of course, but I’ve seen pictures...) - very rustic and old fashioned looking to me. It's got that pretty 'medieval' feel to it (to me at least, as I picture it...not the mushy pile you read about in history books!).

Ok - yes, crock-pots aren’t exactly ‘medieval’ in style (back to the cottage in the forest here...), but I just love the look they produce right now, so we’ll see what happens. Mayhap my little cottage will have to get a magical crock-pot (don’t tell the villagers...our part of the forest does not have electricity yet).

So...I’ve played around with a few recipes I’ve seen here and there, came up with a list of favorite oils and ingredients, and ran them through a lye calculator found on the website for Majestic Mountain Sage (http://www.thesage.com/), a great site for both information and supplies. Using their Sunflower Oil, a bit of Coconut Oil, Olive Oil, Calendula tea and Lye, a sprinkling of Cocoa Butter and Beeswax, I melted and stirred and waited until trace (just like thick pudding...) and left everything in the crock-pot to do as it would.

I used a small crock-pot, after all, this was a test recipe. The crock-pot box noted it would hold 64 oz, so my recipe was around 32 oz, give or take. Do you think it fit? Only an inch left from the top! So, when the foamy gloop started curling around half the crock-pot, the top started rising up, and I opened it and stirred quickly (I don’t think you’re supposed to open it often, don’t want all that lovely heat to escape). About half an hour passed and I looked again, and stirred again, and so on for about two hours. When it started looking like a nice shiny Vaseline, I took it off the heat (yes! I got pictures!).

I stirred and stirred to distribute the heat. I took a small mushy bit and touched my tongue to it to test for lye. Disgusting and old-fashioned, but it works...luckily, or not, it just tasted like plain old soap. I even rolled some into a ball and tried to wash with it...lovely petite bubble formed. So, I added a Tablespoon or two of raw honey, and another for good measure, some oats I had chopped by hand (the magical electric chopper was nowhere to be found...) and stirred and folded and stirred. I added a Tablespoon or three of some heavenly smelling Lavender (just plain Lavendula officinalis) and stirred and folded and stirred some more.
Then I reached for a little jar of 24K Gold Mica dust...tapped it a bit into the pot...and I have to tell you it looked like a fairy exploded (that stuff comes out fast)!  So, I scooped up a bit and tossed some in the sink...then blew softly on the pot to distribute the dust a bit before stirring. Needless to say, the kitchen has a nice shimmery quality to it right now. It was very lovely in the afternoon light...and I don't think my husband noticed when he was getting the BBQ ready later that day...
I spooned the mixture into a wonderful little antique wooden box/drawer which I found in Jamestown, CA at a terrific little antique shop, smoothed the top a bit with my fingers and some wax paper, and set it in the sun for a bit to process just a tad longer. It looked so pretty, with a nice golden sheen on the top (no fairy parts left after the sad explosion...just kidding!). It has a soft lather and the longer it sits on the shelf, the more that soft honey feeling comes out in the lather (not the stickyness, just the softness...).  If all goes well, and this recipe works, I’ll be up and running in no time! I can’t wait!  I will, however, still need to work on packaging...

I'll have a few sample sizes for anyone interested...or at least the first five responders...just let me know and I'll send it off for your appraisal and testing.  Who can pass up free soap!  Can you see the golden sparks?